2014 GameDay
Infrastructure Build Instructions
These are the instructions for creating and configuring your infrastructure for the build portion of the GameDay event.
***IMPORTANT***
Prior to starting the build phase please read and confirm these two items:
1) You will be sharing the keys of your AWS account with another team who will have full access to your account and resources. Make sure that you are working in an AWS account where you are comfortable with loosing all your work.
Now….. ON WITH THE BUILD!!!!

Build Overview
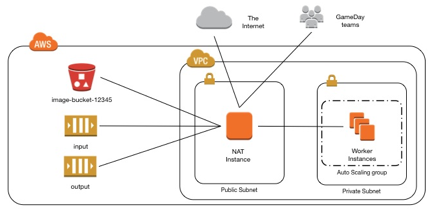
The overall goal of this architecture build is to create a group of EC2 instances that will process batches of images from an SQS queue and place the modified images in an S3 bucket. Additionally, this architecture will have a dedicated VPC with public and private subnets. In order for your build and recovery to be successful these components will need to be in place and working properly. When you are done building your architecture it will look like this:
Register your team
You will need to register your team before you begin the build. This will give the GameDay admins the ability to communicate with you and do the credential exchange that allows an attacking team access to your account. The registration is packed up into a CloudFormation template.
1.
From the AWS Console choose the CloudFormation service:
![]()
2. Click “Create Stack”
3.
Give the stack a name, like MyGamedayTeam.
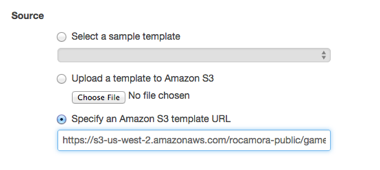
For Source, select “Specify an Amazon S3 template URL” and paste this URL:
https://s3-us-west-2.amazonaws.com/rocamora-public/gameday-player.template
4. Click Next.
5.
Fill out an email that can be used to reach you
during Gameday and a team name

6. Click Next.
7. There is no need to add tags on this page. Click Next.
8. On the review page you can see the configuration for the CloudFormation stack. At the bottom of the page, check the box for “I acknowledge that this template might cause AWS CloudFormation to create IAM resources.” and click Create.
At this point, the CloudFormation
stack that registers your team will be instantiated. This needs to be running
for the entire GameDay. At the end of the day we will
remind you to delete it.
NOTE: This template creates an IAM role
in your account that allows the gameday admins to use
the AWS API during GameDay. At the end of the day,
you should delete this stack to revoke access.
Generate an SSH key pair
In order to be able to connect to EC2 instances you launch, throughout the build stage, you will need an SSH key pair. If you already have an SSH key associated with your AWS account, in the US-East region, you may skip this step.
1. From the AWS Console choose the EC2 service
![]()
2. Click Key Pairs in the navigation pane
3. Click Create Key Pair
4. Enter a name for the new key pair in the Key pair name field of the Create Key Pair dialog box, and then click Create.
- The private key file is
automatically downloaded by your browser. The base file name is the
name you specified as the name of your key pair, and the file name
extension is .pem.
Save the private key file in a safe place.
Important
This is the only chance for you to save the
private key file. You'll need to provide the name of your key pair when you
launch an instance and the corresponding private key each time you connect to
the instance.
- If
you will use an SSH client on a Mac or Linux computer to connect to your
Linux instance, use the following command to set the permissions of your
private key file so that only you can read it.
$ chmod 400 my-key-pair.pem
This key pair will be used to connect to your EC2 instance. Additional details on how to connect to your EC2 instance can be found here:
Linux: http://docs.aws.amazon.com/AWSEC2/latest/UserGuide/ec2-connect-to-instance-linux.html
Windows: http://docs.aws.amazon.com/AWSEC2/latest/WindowsGuide/EC2Win_GetStarted.html
Create your Base VPC
In this exercise you will be creating your base VPC that will hold your EC2 instances as well as control access to EC2 resources. At the end of this phase you will have a VPC with a public subnet, private subnet and a NAT. Additional information about VPCs can be found on the AWS VPC product page. Additional details about NATs can be found on the NAT Instances page of the VPC user guide.
1. When you are logged into the AWS console choose the VPC service
![]()
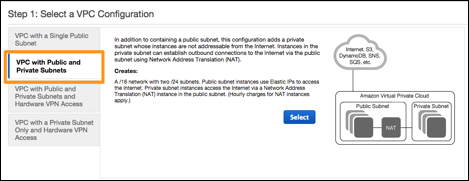
2. Click the Start VPC Wizard button
3. Click the VPC with Public and Private Subnets option
4.
Click Select
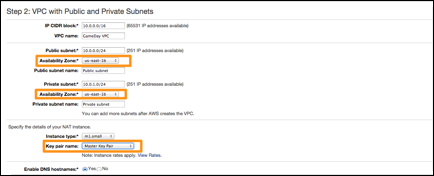
The VPC with Public and Private Subnets panel contains several parameters. Depending on your professional background, the notation may appear different to that which you are familiar. The VPC uses CIDR block notation, such as 10.0.1.0/24, which can also be expressed as 10.0.1.0 with a subnet mask of 255.255.255.0.
The VPC itself is a Class B network in the 10.0.0.0.0 space. If you are familiar with the IPv4 address space, you will recognize this as one of the non-routable address blocks. The overall address space uses in IP CIDR block of 10.0.0.0/16, which is the equivalent of a subnet mask of 255.255.0.0 (a full Class B network).
You will now edit the settings for the Public and Private subnets.
5. Choose an Amazon EC2 Availability Zone (for example, us-east 1b) from the drop down list under Public subnet.
6. Choose the same Availability Zone for Private subnet as the prior step.
7. Choose m1.small for the instance type of your NAT.
8. For the Key pair name, select the one with the same name as the PEM/PPK file that you created earlier from the drop-down list.
Important: Be certain that the subnets are both in the same Amazon EC2 Availability Zone!
9. Optional: You can provide VPC name (e.g GameDay VPC)
10. Click the Create VPC button. This will open a dialog box indicating the progress of creating your VPC:
11. Once the VPC is created, click OK.
Your VPC Dashboard will now display a count of available network elements, which includes your new VPC.
Create a VPC Security Group for your NAT instance
As part of the creation of your VPC a NAT (“Network Address Translation”) EC2 instance was created. The NAT instance allows servers in a Private subnet to initiate outbound connections to the internet to download software and access internet services, such as S3 and SQS.
This next step will create a VPC security group that will permit access to the internet and your resources in the private subnet.
1. Within the VPC Dashboard, click Security Groups in the left panel.
2. Click Create Security Group and provide the following information:
a. Name tag: NAT Security Group
b. Group name: NAT Security Group
c. Description: Security group for NAT instance
d. VPC: Select the VPC you created in earlier steps
e. Click Yes, Create
You should now see the new security group in the VPC Security Groups page. The security group can be edited to allow inbound HTTP traffic.
3. From the Details pane, click the Inbound Rules tab
4. Click Edit
5. From the Type list, select HTTP, and enter the IP CIDR range of your new VPC’s private subnet for Source.
NOTE: IP range of your private subnet is what you defined in the VPC Wizard step and generally will match the IP address in the wizard screen shot in this document.
6. Enter an additional rule to cover HTTPS from the private subnet
7. Enter an additional rule to cover SSH access using a source of 0.0.0.0/0
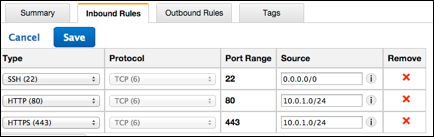
8. Click Save
Your security group is now ready to be assigned to your NAT instance.
Assign security group to NAT instance
This section will cover assigning your newly created security group to the NAT instance that was created through the VPC wizard.
1. In the AWS Console click the EC2 service.
2. Click the Instances link in the Navigation pane.
3. The main window will show a list of all EC2 instances in your account. Click on the line for the NAT instance. Hint: instance type will be an m1.small.
4. At the top of the screen click the Actions button and select Change Security Groups.
5. You will be presented with a list of security groups. Choose the one that you created in the above steps to cover connectivity between your NAT instance and your private subnet.
6. Click the Assign Security Groups button.
Your NAT instance now has the appropriate security group associated with it.
Bastion Host
A bastion host (or “jump box”) is a computer that is configured to prevent unauthorized network access. The bastion host is typically in front of a firewall or in a corporate DMZ. The bastion host usually runs in a very limited set of services (such as a proxy server) so there are fewer network entry points that can be exploited.
In many architectures a Bastion Host is deployed as a stand-alone instance that just serves one purpose. For this particular build exercise the NAT instance will also serve as the Bastion host.
Creating an IAM role
Your batch processing nodes will communicate with Amazon SQS to receive processing instructions and will then store results in Amazon S3. Start by creating an IAM role that grants access to both SQS and S3. This role will then be assigned to your EC2 instances.
1. Return to the AWS console and click IAM.
![]()
2. Click Roles in the left panel.
3. Click Create New Role, then:
a. Role Name: BatchProcessing
b. Click Continue
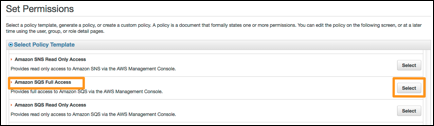
4. In Select Role Type, select Amazon EC2.
5. Locate the Amazon SQS Full Access policy
and click Select (you will need to scroll down to find it, or use the browser’s
Find command):
A policy
document will be displayed.
6. Click Next Step and then click Create
Role.
You now
need to add additional permissions for S3.
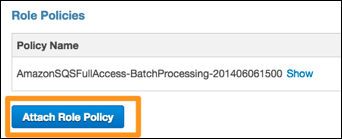
7. Select the BatchProcessing role that you
just created.
8. Click the Attach Role Policy button, in
the Role Policies section of the screen, to attach another policy:
9. Locate the Amazon S3 Full Access policy
and click Select.
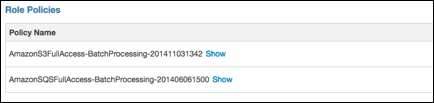
10. Click
Apply Policy.
Your Role
Policies should now look similar to this:
Create a Master EC2 Instance
You can
now launch an EC2 instance with a configuration script that loads ImageMagick and the batch processing software. This
‘master’ instance will then be used to create an Amazon Machine Image.
1. From the AWS Management Console, select
EC2 from the Services menu.
2. Click Launch Instance.
3. Locate the Amazon Linux AMI (HVM) and click
Select.
4. At the Choose Instance Type panel,
choose t2.micro for your instance
type. Click Next: Configure
Instance Details.
5. At the Configure Instance Details panel:
a. Network: Choose the VPC that you created
as part of this build
b. Subnet: Choose the private subnet that
you created as part of the VPC in this build.
c. IAM
Role: BatchProcessing
d. Expand
the Advanced Details section. (You may need to scroll down to locate it.)
e. User
Data: Paste in the below text. It should look similar to this:
|
#!/bin/sh # Install ImageMagick, the AWS SDK for Python, and create a directory yum install -y ImageMagick easy_install argparse mkdir /home/ec2-user/jobs # Download and install the batch processing script # The following command must be on a single line wget -O /home/ec2-user/image_processor.py https://us-west-2-aws-training.s3.amazonaws.com/architecting-lab-3-creating-a-batch-processing-cluster-3.1/static/image_processor.py |
d. Click Next: Add Storage.
6. There are no modifications needed in the
Add Storage panel. Click Next: Tag Instance.
7. At the Tag Instance panel, enter the
Value: Master
8. Click Next: Configure Security Group.
9. At the Configure Security Group panel:
a.
Security group name: BatchProcessing
b.
Description: Batch Processing
c. Verify
there are is an existing rule for port 22 (SSH) with a source of 0.0.0.0/0.
This will
only allow access to port 22, which permits SSH connections. For this lab it is
allowing access from any IP address on the Internet. Normally, you will want to
restrict access to the address ranges specifically required for administration.
10. Click
Review and Launch.
11. Click
Launch. You are presented with the Select an existing key pair or create a new
key pair dialog. Choose the
SSH key which you generated at the beginning of the build phase.
12. Check
the acknowledgement box and click Launch Instances.
13. Click
View Instances (you might need to scroll down to see it).
If you feel the need to access your host and verify configuration, before creating an AMI, go to the Confirming Functionality on EC2 instances section of these build instructions.
Creating an AMI from
your batch processing instance
In this
section you will use the AWS Management Console to create an Amazon Machine
Image (AMI) from the running ‘Master’ instance. By creating an AMI from the
instance you configured, you can launch many more identically configured
instances quickly and easily.
1. Select
your instance in the EC2 Management Console.
2. From
the Actions menu, select Create Image, then:
a. Image
Name: Worker Image
b. Image
Description: Batch Processing worker
c. Click
Create Image, then click Close
Your
instance will automatically reboot during this process, causing your SSH
session to disconnect – this is normal.
3. Click AMIs in the left panel to view
your AMI.
Your AMI
will initially show as pending and will eventually change to available.
Please continue onto the next section – there is no need to wait for
your AMI to become available.
Creating two SQS task queues
In this
section, you will use the AWS Management Console to create two Simple Queuing
Service (SQS) queues to hold input and output tasks. You will eventually
dispatch work via the queue, and view the results provided by your worker nodes
in the queue.
** The
queue names that you create must exactly match the names in these instructions
in order for your processing scripts to work as is. If you want to use different queue names
you will need to pass queue name parameters to the image processing script.
1. In the AWS Management Console, select
SQS from the Services menu.
2. Click Create New Queue, then:
a. Queue Name: input
b.
Default Visibility Timeout: 90 seconds
c. Click
Create Queue
3. Repeat
the previous step to create another
queue named: output
You can
now put some work into the input queue. It will remain in the queue until your
worker nodes are launch later in the lab. This also gives time for the queue metrics
to be received in CloudWatch.
4. Select
your input queue.
5. From
the Queue Actions menu, select: Send a Message.
6. Paste
a list of image URLs into the message. Choose any image URLs that you like from
the internet.
Your list will look something like this:
7. Click Send Message then click Close.
Creating an S3 bucket
In this
section you will create an Amazon S3 bucket to hold the output from your worker
nodes.
Your
bucket name needs to be globally unique, so change the numbers (shown below) to
generate a unique bucket name.
1. In the AWS Management Console, select S3
from the Services menu.
2. Click Create Bucket, then:
a. Bucket
Name: image-bucket-12345
(Change
the numbers to create a unique bucket name)
**Your
bucket name must start with image-bucket-
b. Click
Create
You are
now ready to launch worker nodes within an Auto Scaling group.
Launching worker nodes
In this
section, you will create an Auto Scaling group of worker nodes to process your
work. After you have successfully tested the initial node, you will add Scaling
Policies to automatically expand the size of the Auto Scaling group.
Creating an auto
scaling launch configuration
Your
first step in creating an Auto Scaling group is to create a Launch
Configuration. A Launch Configuration specifies details such as which AMI to
use when launching new instances, which instance type to use, and what
configuration scripts should be run.
1. In the AWS Management Console, select
EC2 from the Services menu.
2. Click Launch Configurations in the left
panel (you may need to scroll down to see it). Since you have not yet created an Auto
Scaling group, the console assumes you ultimately want to create an Auto
Scaling group.
3. Click Create Auto Scaling group.
4. Click Create launch configuration.
5. Click My AMIs in the left panel.
6. Select your Worker Image AMI:

7. On the Create Instance Type panel choose
the t2.micro instance, click Next: Configure details.
8. On the Configure details panel:
a. Name:
Workers
b. IAM
Role: BatchProcessing
c. Expand
the Advanced Details section.
d. User
Data: Paste in the text listed below:
|
#!/bin/sh /usr/bin/python /home/ec2-user/image_processor.py & |
This User
Data script will launch the two processes for the application that does image
conversion. All the software to run these processes has already been loaded
onto your AMI.
e.
Click Next: Add Storage.
9. There are no modifications needed in the
Add Storage panel. Click Next: Configure Security Group.
10. At the Configure Security Group panel:
a. Click
Select an existing security group
b. Select
the BatchProcessing security group you created
earlier
c. Click
Review (in the bottom-right)
11. Click
Create launch configuration. You are presented with the Select an existing key
pair or create a new key pair dialog.
12. Check
the acknowledgement box and click Create launch configuration.
You are
now prompted to create an Auto Scaling group that uses this Launch Configuration.
Creating an auto
scaling group
Now that
your launch configuration is created, create an Auto Scaling group to
automatically launch your worker nodes.
1. In the Configure Auto Scaling group
details panel:
a. Group
Name: worker-group
b. Network:
Select the VPC that you created as part of this build
c. Subnet:
select the private subnet of the VPC that you created as part of this build.
d. Click
Next: Configure Scaling Properties.
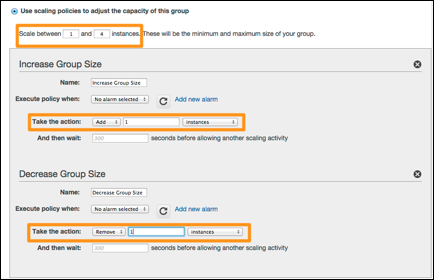
2. On the Configure scaling
policies panel (see picture below):
a. Click Use scaling policies to adjust the
capacity of this group
b. Scale
between: 1 and 4 instances
c. Under
Increase Group Size: Take the Action: Add 1 instances
d. Under
Decrease Group Size: Take the Action: Remove 1 instances
3. Click Review.
4. Click Create Auto Scaling Group.
5. Click Close.
6. Click Instances in the left panel to
view your worker instances.
Your Auto
Scaling group has only been configured to run a single instance at the moment,
and no alarms have been attached to the Scaling Policies. Once you have
verified that the worker node is functioning correctly, you will create alarms
to automatically adjust the number of worker nodes.
Dispatching work and
viewing results
In this
section you will use the SQS Management Console to put more messages in your
SQS input queue. Your worker nodes expect a newline-delimited list of image
URLs.
1. In the AWS Management Console, select
SQS from the Services menu.
2. Select your input queue.
3. Confirm that there is 1 Message
Available in your output queue
|
If there is no
message in your output queue: · Ensure that your queues are named input and output · Ensure that your BatchProcessing role has granted full permissions for SQS and S3. · Ensure that your worker node is using the BatchProcessing IAM role (defined in the Launch Configuration). · Ensure that your worker node is running. |
Follow
these steps to view the output and open the resulting link in a browser:
4. Select your output queue.
5. From the Queue Actions menu, select
View/Delete Messages.
6. Click Start Polling for Messages.
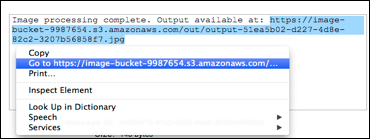
7. Find your message and click More Details
to view the message body. The message will contain a link to the output:

8. To view the montage image, select the
link, right-click, and choose Go to Address in New Tab (wording might vary by
web browser). Warning: Using Ctrl-C to copy the URL does not work in this
read-only text field. Use right-click to copy text or go to the link:
If the
message says Output available at: None, then an error has occurred. Please
request assistance from GameDay staff to debug your
worker node configuration.
You are
now ready to create CloudWatch Alarms based on the
size of the input queue. To cause metrics to flow from SQS to CloudWatch, you will need to keep your queue size above
zero for several minutes.
9. Send more messages to your input queue
(10+) so that the queue is above zero for several minutes. You can use the Send
Another Message button to send the same message multiple times.
Monitoring the
cluster
You can
now use CloudWatch to monitor your cluster. You will
define a CloudWatch Alarm for use with Auto Scaling
Policies.
1. In the AWS Management Console, select CloudWatch from the Services menu.
2. Click Browse Metrics.
3. Click the SQS Metrics header. If the
header is not visible, return to your input queue and ensure that there are messages queued for processing. This will trigger
metrics to be sent to CloudWatch after a few minutes.
The ‘Visible’ count may take a little bit longer to appear.
4. Select the line for:
· Queue Name: input
· Metric Name: ApproximateNumberOfMessagesVisible
![]()
Note:
This metric can take a few minutes before it becomes available. If you don’t
see it, wait a few minutes and browse your metrics again.
5. Click Create Alarm (in the
bottom-right).
6. In Alarm Threshold, use these values:
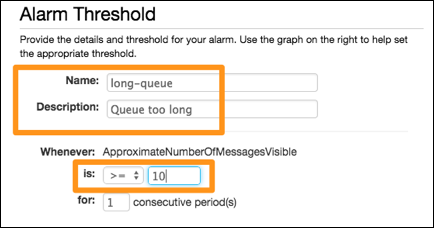
7. In Actions:
a. Delete the
existing Notification action.
b. Add an AutoScaling Action, then use these values:

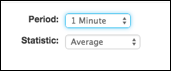
8. Set period to 1 minute (bottom-right):
Testing your Auto Scaling group
You are
now ready to test your Auto Scaling group!
1. Add enough messages (20+) to your queue
to trigger your Alarm.
2. Observe as your instances are scaled-out
and the messages in your queue are processed more quickly.
It will take several minutes for your
Alarm to trigger. If you
see INSUFFICIENT_DATA, keep trying. It will eventually work if you keep above
10 messages in your input queue for enough minutes.
Congratulations!!! You are done with the build phase. Take some time to think about how you will cope with the destroy and recovery phases.

------------------------------------
Confirming functionality on EC2 instances
At this point your architecture configuration is complete. These build instructions will have guided you to a complete working architecture. If you would like to confirm that your architecture is working, or need to troubleshoot your worker nodes please use the following guidelines.
Connecting to the bastion host
To get started with connecting to your bastion host, reference the below user guide that corresponds with your laptop operating system. These guides will tell you how to use your key to connect to your instance and transfer files.
Windows – Putty: http://docs.aws.amazon.com/AWSEC2/latest/UserGuide/putty.html
Mac – Terminal: http://docs.aws.amazon.com/AWSEC2/latest/UserGuide/AccessingInstancesLinux.html
Transferring your private key
to the Bastion Instance
In order to access your image processing EC2 instances you must first connect to your Bastion Host. As outlined earlier the NAT instance, which was generated as part of your VPC creation will also serve as your Bastion Instance.
In order to connect to your EC2 image processing instances you will need to transfer your private ssh key from your laptop to the bastion instance. Reference the Windows or Linux connection guides, listed above, to use Putty SCP or SCP to transfer your private .PEM key to the NAT instance.
Connecting to your worker
instances
Once on your bastion host you can then connect to your image processor workers. Connecting to your image processor workers will be the same if you are on Windows or Mac.
From the EC2 service section of the AWS Console click on the Instances link in the navigation pane. Click on the EC2 instance for the image processor instance that you want to connect to. From the details section for the EC2 instance copy the internal IP address.
From the terminal session that is open from your bastion host execute the command: ssh –i /path/to/key.pem ec2-user@<worker node internal IP>
At this point you will be on the worker instance and be able to view configuration and test running the image processor tools.